Battery switch on travel trailer function is crucial for managing your RV’s power. Understanding how to use and maintain your battery switch is key to preventing electrical issues and maximizing your camping experience. This guide covers different switch types, safe connection and disconnection procedures, troubleshooting common problems, and essential safety precautions to keep you powered up and safe on the road.
We’ll explore everything from single-pole switches to more complex dual-battery setups, explaining the advantages and disadvantages of each. Learn how your battery switch interacts with other electrical components like solar panels and inverters, and discover how to perform regular maintenance to keep your system running smoothly for years to come. We’ll even cover some common pitfalls and how to avoid them.
Safety Considerations with Battery Switches: Battery Switch On Travel Trailer Function
Working with travel trailer batteries and their associated switches requires careful attention to safety. Improper handling can lead to serious injury from electrical shock, burns, or explosions due to the release of flammable gases. Understanding the risks and taking appropriate precautions is crucial for a safe and enjoyable camping experience.
Battery switches, while designed to simplify battery management, present their own set of hazards if not used correctly. Incorrect operation can lead to accidental short circuits, sparking, and potential fire hazards. Always treat batteries and their switching systems with respect and follow established safety procedures.
Potential Hazards of Incorrect Battery Switch Usage
Incorrect usage of battery switches can result in several dangers. A common issue is accidentally connecting the battery in reverse polarity, which can damage sensitive electronic equipment or even cause a fire. Furthermore, loose connections or damaged wiring can create sparks and ignite flammable gases that often accumulate near batteries. Overloading the switch beyond its rated capacity can also lead to overheating and potential failure, creating further safety risks.
Importance of Personal Protective Equipment (PPE), Battery switch on travel trailer function
Protecting yourself is paramount when working with batteries. Always wear appropriate personal protective equipment (PPE). This includes safety glasses to protect your eyes from sparks or acid splashes, rubber gloves to insulate your hands and prevent chemical burns from battery acid, and closed-toe shoes to protect your feet from dropped objects or spills. Consider using a face shield for added protection against battery acid splashes.
Never work on batteries in wet or damp conditions.
Safety Precautions When Working with Travel Trailer Batteries and Switches
Before beginning any work, it’s essential to understand and follow these key safety precautions:
- Always disconnect the negative (-) battery terminal first, then the positive (+) terminal. When reconnecting, reverse this process, connecting the positive (+) terminal last.
- Inspect all wiring and connections for any signs of damage, corrosion, or looseness before operating the switch. Replace any damaged components immediately.
- Ensure adequate ventilation when working near batteries, as they release flammable hydrogen gas. Never work on batteries in enclosed spaces.
- Use insulated tools to avoid accidental short circuits. Avoid wearing loose clothing or jewelry that could get caught in moving parts or come into contact with live terminals.
- Have a fire extinguisher readily available, specifically one rated for Class B (flammable liquids) and Class C (electrical) fires.
- If you are unsure about any aspect of working with your travel trailer’s battery system, consult a qualified technician or refer to your trailer’s owner’s manual.
- Never attempt repairs or modifications to the battery system unless you have the necessary knowledge and experience. Improper repairs can create serious safety hazards.
Battery Switch Maintenance
Keeping your travel trailer’s battery switch in good working order is crucial for reliable power and safety. Regular maintenance prevents problems before they lead to dead batteries or electrical issues on the road. A little preventative care goes a long way.Regular maintenance of your battery switch should be a part of your overall travel trailer pre-trip checklist. A simple inspection can save you from a lot of headaches down the road.
Inspection for Corrosion and Loose Connections
Corrosion is the enemy of electrical connections. Regularly inspect the battery switch terminals, cables, and the switch itself for signs of corrosion, which appears as a greenish-white or bluish-white powdery substance. Loose connections can also cause problems, leading to poor contact and potential overheating. Visually check for any loose bolts or wires. Pay close attention to the points where the battery cables connect to the switch and to the ground connection.
If you notice any corrosion or loose connections, address them immediately.
Cleaning and Lubricating Switch Components
Cleaning corroded battery switch components involves removing the corrosion and ensuring a clean, tight connection. Use a wire brush or sandpaper to carefully remove any corrosion from the terminals and cable ends. For stubborn corrosion, a baking soda and water paste can be effective. After cleaning, apply a dielectric grease to the terminals and connections. This grease prevents future corrosion and ensures good electrical contact.
Planning a trip? Awesome! Don’t forget travel insurance! Check out aon travel insurance for comprehensive coverage. They offer a wide range of plans, so you can find one that fits your needs and budget. Seriously, peace of mind is priceless, especially when you’re exploring new places. And if you’re part of a group or organization, aon travel insurance might have special deals tailored just for you.
So browse their options and get insured before you go!
Do not use petroleum-based lubricants. A clean, lubricated switch will operate smoothly and reliably.
Replacing a Faulty Battery Switch
If your battery switch is consistently malfunctioning despite cleaning and lubrication, replacement is necessary. Before beginning, disconnect the negative battery cable to prevent accidental short circuits. Carefully remove the old switch, noting the wiring configuration before disconnecting any wires. Install the new switch, ensuring the wires are connected correctly according to the wiring diagram. Secure all connections and reattach the negative battery cable.
Planning a trip? Don’t forget travel insurance! Check out aon travel insurance for comprehensive coverage. They offer various plans to suit your needs, from basic medical to more extensive options. If you’re traveling for work, aon travel insurance might have specialized policies designed for business trips, so definitely compare your options before you go.
Getting the right insurance is key for a worry-free adventure.
Always refer to your travel trailer’s wiring diagram and consult a qualified technician if you are unsure about any aspect of the process. Using the incorrect switch or improper installation can cause serious electrical problems.
Different Battery Switch Configurations
Choosing the right battery switch configuration for your travel trailer depends heavily on your power needs and the number of batteries you’ll be using. Understanding the different setups and their implications is key to ensuring reliable power and efficient power management. Let’s explore the common configurations.
Single Battery Setup
This is the simplest configuration, ideal for smaller travel trailers with modest power demands. A single battery is connected directly to the switch, which controls the power flow to the trailer’s electrical system.
Battery -> Battery Switch -> Trailer Electrical System
Advantages include simplicity, low cost, and ease of installation. However, disadvantages include limited power capacity, potentially leaving you short on power for extended trips or high-power appliances. Power management is straightforward; you essentially have one power source to manage.
Dual Battery Setup with Combined System
This setup uses two batteries wired in parallel, effectively doubling the available amperage-hours (Ah). Both batteries feed the trailer’s electrical system simultaneously. A single switch controls both batteries.
Battery 1 -> Battery 2 -> Battery Switch -> Trailer Electrical System
This configuration provides increased capacity compared to a single battery system. However, it doesn’t offer separate control over each battery. If one battery fails, the entire system is affected. Power management involves monitoring the combined capacity of both batteries.
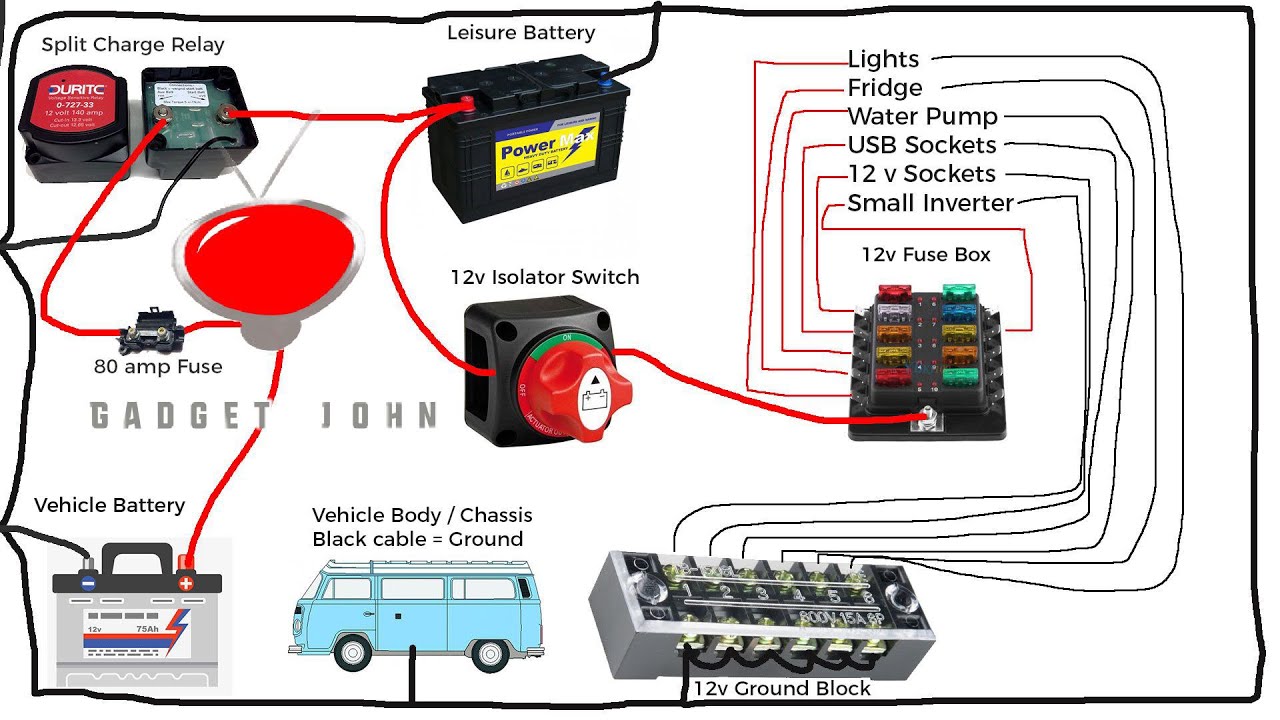
Dual Battery Setup with Separate Systems
This configuration involves two batteries, each with its own switch, allowing for independent control. One battery might power house functions, while the other powers the starting system of a vehicle towing the trailer.
Battery 1 -> Battery Switch 1 -> Trailer House System
Battery 2 -> Battery Switch 2 -> Trailer Starting System (or other dedicated circuit)
Advantages include the ability to isolate batteries, preventing a dead battery from affecting the other, and dedicated power sources for specific needs. Disadvantages include higher installation costs and slightly more complex wiring. Power management requires monitoring each battery’s charge level individually.
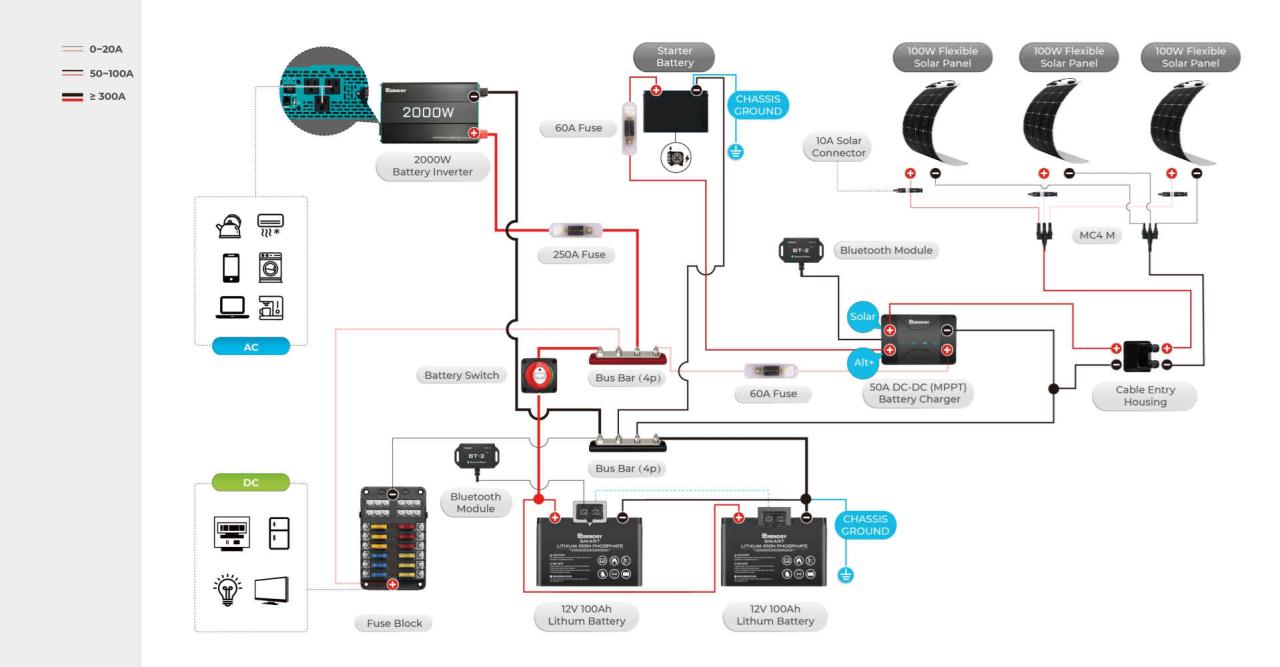
Multiple Battery Banks
Larger travel trailers may use multiple battery banks, each with its own switch. This allows for dedicated power sources for different systems (e.g., house batteries, starting batteries, solar charging system).
Battery Bank 1 (House) -> Battery Switch 1 -> House System
Battery Bank 2 (Starting) -> Battery Switch 2 -> Starting System
Battery Bank 3 (Solar) -> Battery Switch 3 -> Charging System
This setup offers excellent power management and redundancy, but is the most complex and expensive to install. It allows for prioritized power distribution and ensures that a problem in one system doesn’t affect others. Power management involves monitoring each battery bank’s charge level and ensuring proper charging and distribution.
Mastering your travel trailer’s battery switch is a simple yet powerful way to improve your RVing experience. By understanding the different types of switches, following safe operating procedures, and performing regular maintenance, you can ensure a reliable power supply for all your onboard appliances and avoid costly repairs. Remember, safety is paramount; always prioritize proper handling and consult a professional if you encounter any issues you can’t resolve yourself.
Happy travels!
Commonly Asked Questions
What happens if I accidentally leave my battery switch in the “off” position?
You’ll lose power to all appliances and systems connected to your house batteries. This means no lights, no water pump, and no AC.
Can I use a battery switch with any type of battery?
Generally, yes, but it’s best to ensure the switch’s amperage rating is sufficient for your battery bank. Consult your battery and switch manuals for compatibility.
How often should I clean my battery switch terminals?
At least once a year, or more often if you notice corrosion or loose connections. Regular cleaning prevents poor connections and potential electrical fires.
My battery switch feels hot to the touch. Is this normal?
No, excessive heat is not normal. This could indicate a loose connection, high current draw, or a faulty switch. Turn off the switch immediately and investigate the problem.
